
If camshaft is checked out faulty,it has to be replaced.
To confirm that,i recommend you to go through cam shaft servicing procedure first.
How to service
http://repairhelpcenter.blogspot.in/2012/02/how-to-service-cam-shaft-camshaft.html
Now once its confirmed camshaft is the cause of problem,then go through this replacement procedure.
 Some camshafts have a thrust plate to control end thrust.
 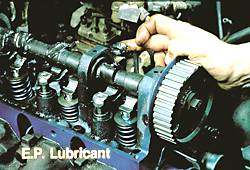 A special assembly lube is used on cam lobes.
 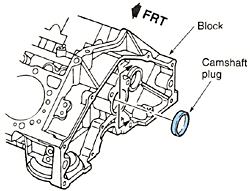 The camshaft plug is installed at the rear of the block.
How to Refit Rear seat on Rover 600?
http://repairhelpcenter.blogspot.com/2012/01/how-to-refit-rear-seat-on-rover-600.html
How to replace the speakers on 2011 Ford Edge?
http://technoanswers.blogspot.com/2012/01/how-to-replace-speakers-on-2011-ford.html
How to Remove Rear seat on Rover 600?
http://repairhelpcenter.blogspot.com/2012/01/there-are-3-10mm-bolts-at-back-of-seats.html
Hub, Bearing & Steering Knuckle removal on Mitsubishi car models?
http://howtobyme.blogspot.in/2012/02/hub-bearing-steering-knuckle-removal-on.html
How to replace Lower Control Arms on Mitsubishi car models?
http://howtobyme.blogspot.in/2012/02/how-to-replace-lower-control-arms-on.html
Gasoline burning smell and white smoke from exhaust?
http://technoanswers.blogspot.in/2012/02/gasoline-burning-smell-and-white-smoke.html
http://technoanswers.blogspot.com/2012/01/toyota-solara-rattling-in-rear.html
Parking light stay on constantly?
http://repairhelpcenter.blogspot.com/2012/01/parking-light-stay-on-constantly.html
Engine hard to start after gas refill?
http://repairhelpcenter.blogspot.com/2012/01/engine-hard-to-start-after-gas-refill.html
How to remove Strut Assembly,the Coil spring on Mitsubishi car models?
http://howtobyme.blogspot.in/2012/02/how-to-remove-strut-assemblythe-coil.html
2005 ford ranger cruise control not working?
http://technoanswers.blogspot.in/2012/02/2005-ford-ranger-cruise-control-not.html
Fuel pressure and spark is good but ford escort will not start?
http://technoanswers.blogspot.in/2012/01/fuel-pressure-and-spark-is-good-but.html
How to replace wheel bearing on Honda Civic?
http://repairhelpcenter.blogspot.com/2012/01/how-to-replace-wheel-bearing-on-honda.html
Car stalls when MAF sensor is connected?
http://technoanswers.blogspot.in/2012/01/car-stalls-when-maf-sensor-is-connected.html
Do snow tires go on the back or front?
Where is Key chip memory located on 2004 ford Freestar?
How to fill Brake line antifreeze on freightliner classic?
http://technoanswers.blogspot.com/2012/01/how-to-fill-brake-line-antifreeze-on.html
To confirm that,i recommend you to go through cam shaft servicing procedure first.
How to service Cam Shaft? Camshaft servicing?
http://repairhelpcenter.blogspot.in/2012/02/how-to-service-cam-shaft-camshaft.htmlNow once its confirmed camshaft is the cause of problem,then go through this replacement procedure.
Most overhead valve engine have different size journals, with the largest being toward the front of the engine. This is done to make the camshaft removal and installation easier.
Removing OHC Camshafts
On overhead cam engines, the camshaft is removed with the cylinder head. Follow manufacturer's instructions for the removal of the cam from the head. This varies with the design of the head.
If the lifters on a pushrod engine are too worn to be reused, the following procedure will save time in removing the cam:
- With the engine in the upside down position, move the lifters to the highest positions in their bores by turning the crankshaft one complete revolution.
- Use a piece of wooden dowel to finish pushing the lifters into their bores so that they will clear the cam.The lifters must be removed high enough to allow the cam to be removed. Now the cam can be carefully removed. This is a delicate operation.

- Support the camshaft during removal to avoid dragging lobes over bearing surfaces, which would damage bearings and lobes.
- Do not bump cam lobe edges, which can cause chipping.
Removing Pushrod Camshafts
Some engines use a bolt-on cam thrust plate.
Gear-drive cam bolts can be accessed through holes in the cam gear to remove the cam.
- An impact screwdriver is sometimes necessary to remove Phillips head screws.
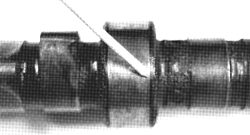
- Varnish often builds up on the edges of the cam journals, making it difficult to remove the cam. Squirt some penetrating oil on the varnish.Varnish buildup on the edge of the cam journal makes camshaft removal difficult. Unbolt the cam sprocket and slide or pry it off the cam.
- Then remove the chain.
- Reinstall the sprocket and tighten one bolt fingertight.
- Use it as a "handle" to remove the cam.
- It is easier to remove the camshaft without damaging the lobes if the engine is stood on end.
Installing OHV (Overhead Valve) Camshafts
Install the camshaft into the block. Be careful to protect the journals and bearings. If the block is not installed on the engine stand, it can be rested upright (vertically) to make cam installation easier. Following is a guide to typical procedures for installing the camshaft into OHV engines.
NOTE- Determine oil clearance between the installed camshaft bearings and the camshaft journals and compare with specifications.
- Use a rag soaked in solvent to remove any coating on the camshaft journals. Be careful not to remove the coating on the lobes.
- Lubricate the journals with engine oil or assembly lube before fitting the camshaft into the block.
- Install the camshaft, preventing any contact between the lobes and the bearings.
- When the camshaft is fully seated in place, spin it to assure free rotation.
- Install the sprocket or gear and use it as a temporary handle to turn the cam during installation.
- If rotation is impaired because of high spots on the bearings, they can be removed using a three-corner scraper.
- Slight corrections to the bearings can be made with a flex hone.
- Make sure to clean the engine block after performing these operations.
- If the bearings are not the cause of the binding, the camshaft may be bent.
- Apply sealer to the outer edge of the rear core plug and install the plug with the convex side out.
- Drive the plug to the specified depth.
- Once the core plug is installed, use a dull punch to deform it slightly. This increases the tension applied to the outer edges to provide a positive seal.
- After the core plug is installed, rotate the camshaft to be sure the plug is not causing interference.
- Install the camshaft retainer plate.
- Measure the camshaft end play and correct it if needed.
- Apply special camshaft break-in high-pressure lubricant onto the lobes, being careful not to get any onto the journals.
After Reassembling the Engine
It is especially important that the engine starts up immediately to avoid excessive loading between the cam lobes and the lifters.
- Start the engine and run it at 1,500 - 2,000 rpm for about 20 minutes to allow the cam and lifters to begin to wear to each other.
- Idling should be avoided during this period to prevent cam and lifter failure and because, during idle, less oil is thrown off the connecting rod journals onto the cylinder walls, cam, and other parts that need this critical lubrication.
- Make sure the engine has oil pressure.
- Watch the coolant temperature to see that it does not climb too high.
- Check for oil leaks.
- If any adjustments are needed the engine should be shut off immediately.
- After the initial 20-minute period, the idle can be reset and the ignition timing can be checked with a timing light.
This details will help you.
Thanks.
See below latest solved car problems :-----

No comments:
Post a Comment